Supplies:
8.5 X 11" piece of cardstock
Scor-Pal
printed paper, stamped image, etc. for decorating
ink & sponge (optional)
small binder clip
adhesive
Directions:
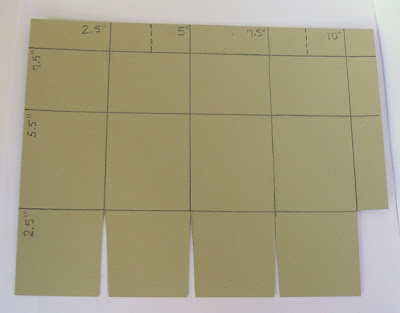
Along short side of paper, score at 2.5", 5.5" and 7.5"
Turn paper and score along long side at 2.5", 5", 7.5" and 10". Cut out bottom right hand corner and notch bottom tabs as shown in photo below. Add 1" scores halfway between 2.5" & 5" scores and halfway between the 7.5" and 10" scores, as shown below
To find the half way point, align your scores along the 3" and 5.5" marks as shown below. Score at the 4.25" mark. repeat for other 1" score.
Using your bone folder, go over all of your score marks. This will make your box much easier to assemble!
If you're going to ink the edges of your box, the easiest time to do this is before assembling your box. Also, this is the easiest time to add any decorative paper and/or images. Cut your printed paper to 2.25" X 2.75".
Next, add adhesive as shown below. I recommend using a dry adhesive since it grabs right away and you don't have to hold or clamp the box together while a wet glue dries. The second section is the best one to place your image on. The first and third panels are notched to form the sides of the box. The panel all the way on the right is where the sides of the paper are joined to form the box. This is best hidden at the back of the box.
The fourth bottom section has adhesive on the other side. This is the bottom flap of your box.and will cover the other flaps.
How to assemble the box is a matter of personal choice. I find it easiest to adhere the 3 inner bottom flaps to each other as I fold my paper into a box shape, then adhere the side seam of the box, leaving the last bottom flap as a final step. Some people may prefer to adhere the long side first and then worry about the bottom. (Kerry does it this way.) Experiment with how the box folds together before trying to glue it.
Use a binder clip to hold your box closed. You can find decorative ones in the store. Or, use your paper scraps and some adhesive to cover your clip. (This is a great way to use up any super skinny strips of paper.) Add a bow, if desired.
Voila!
Image: Penny Black
Paper: River Rock (SU!), My Minds Eye dp, pink cs (Bazzill)
One last tip. If you are making a lot of these, I would suggest scoring all the pieces of paper in one direction (i.e., along the short side of the paper or along the long side of the paper) and then score all of them again in the other direction. Once you get into the groove of scoring at certain intervals (no pun intended) it's easiest to keep scoring all the papers that way and then score them all in the other pattern. (As opposed to score, turn, score for each piece of 8.5 X 11 cardstock.)
Give these a try! They are a lot of fun.
Lisa


2 comments:
What a great tutorial! TFS!
Love love love this. I am going to have to give it a try!
Post a Comment